Shifting Local Setup to AWS
Objective
The aim of this section is to shift the entire setup from the local machine to Amazon Web Services (AWS) Cloud to provide a solution to the 1st point of the problem statement under Task 4.
Configuring Jenkins with EC2 Instances
Starting an EC2 instance
To start shifting the entire setup that I had locally on my machine, firstly I brought up an EC2 instance to install and run Jenkins on. Below mentioned are the steps to spin up an EC2 instance:
-
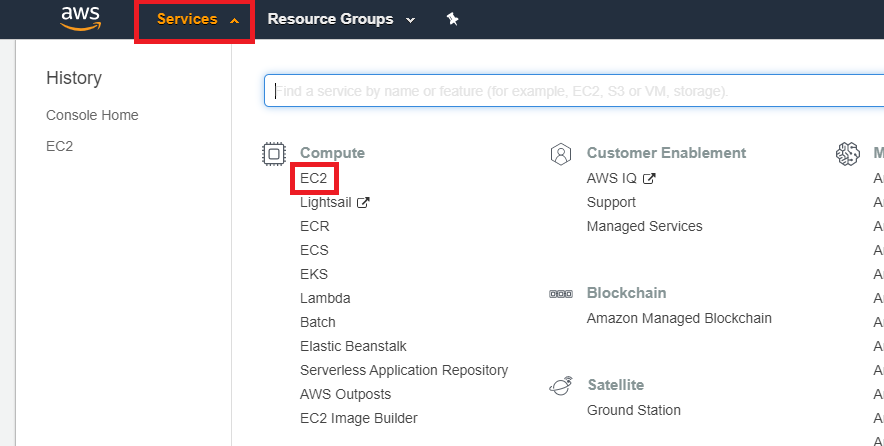
Firstly, I navigated to the EC2 page under 'Services'.
-
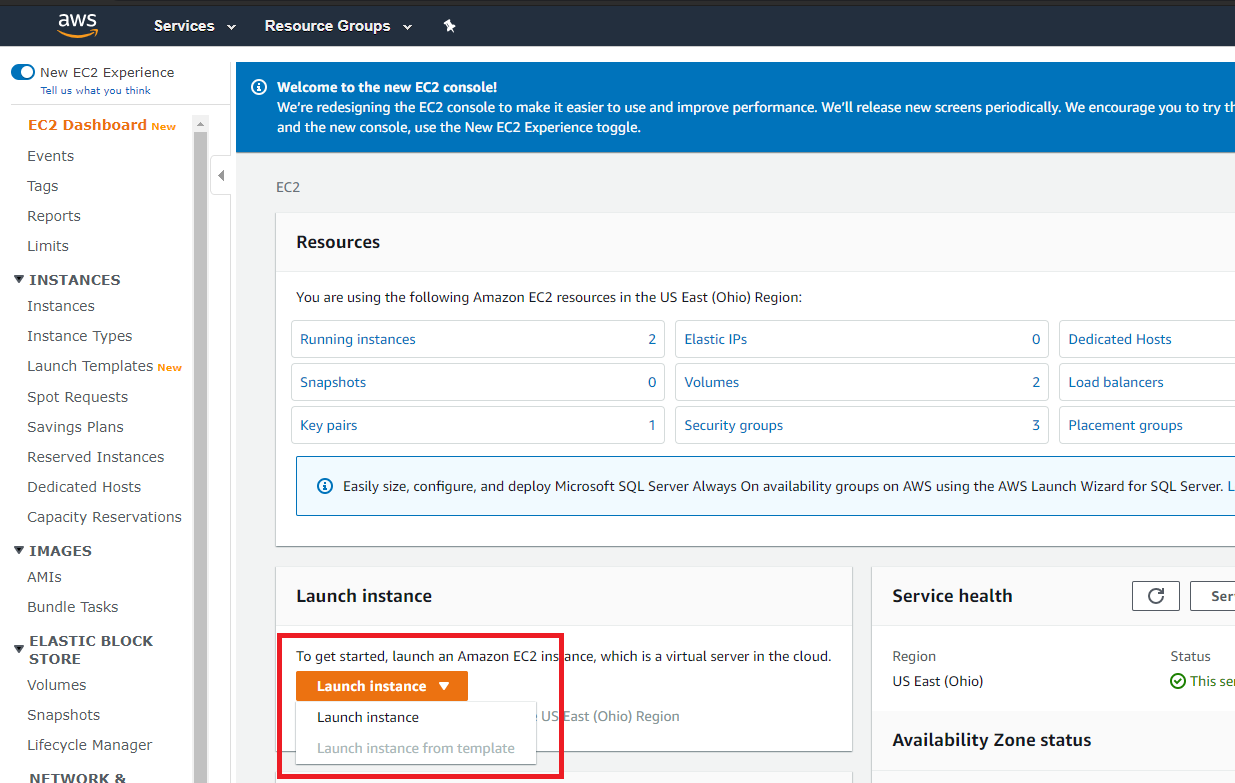
Then I clicked on the 'Launch instance' button and selected the 'Launch instance' option from the drop-down menu instead of the 'Launch instance from template' option as I did not have any template configured.
-
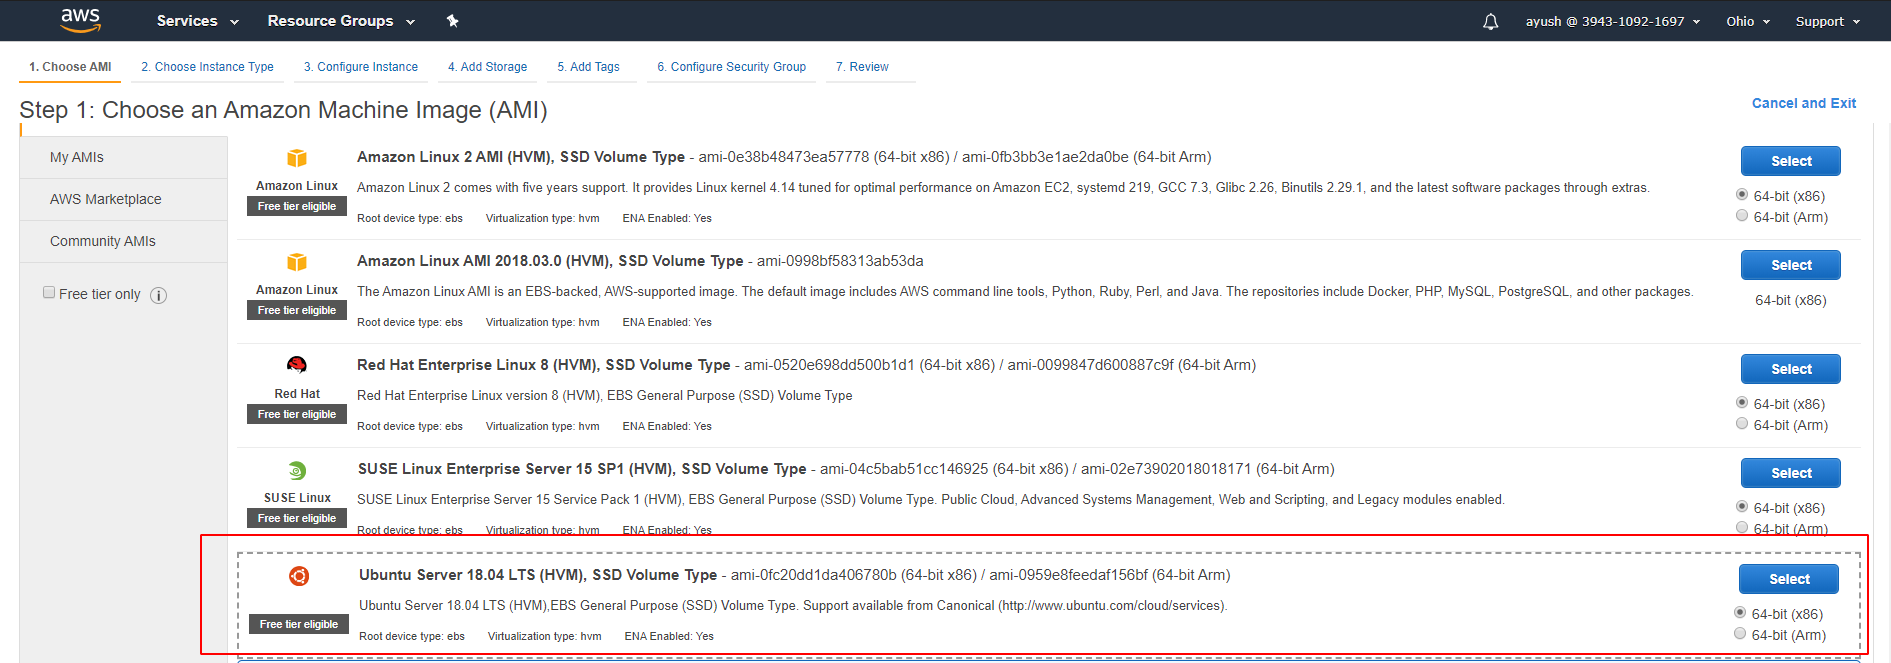
Under the 'Choose AMI' menu, I selected the 'Ubuntu Server 18.04 LTS (HVM), SSD Volume Type' option as I was using Ubuntu 18.04 as the OS on my local setup.
-
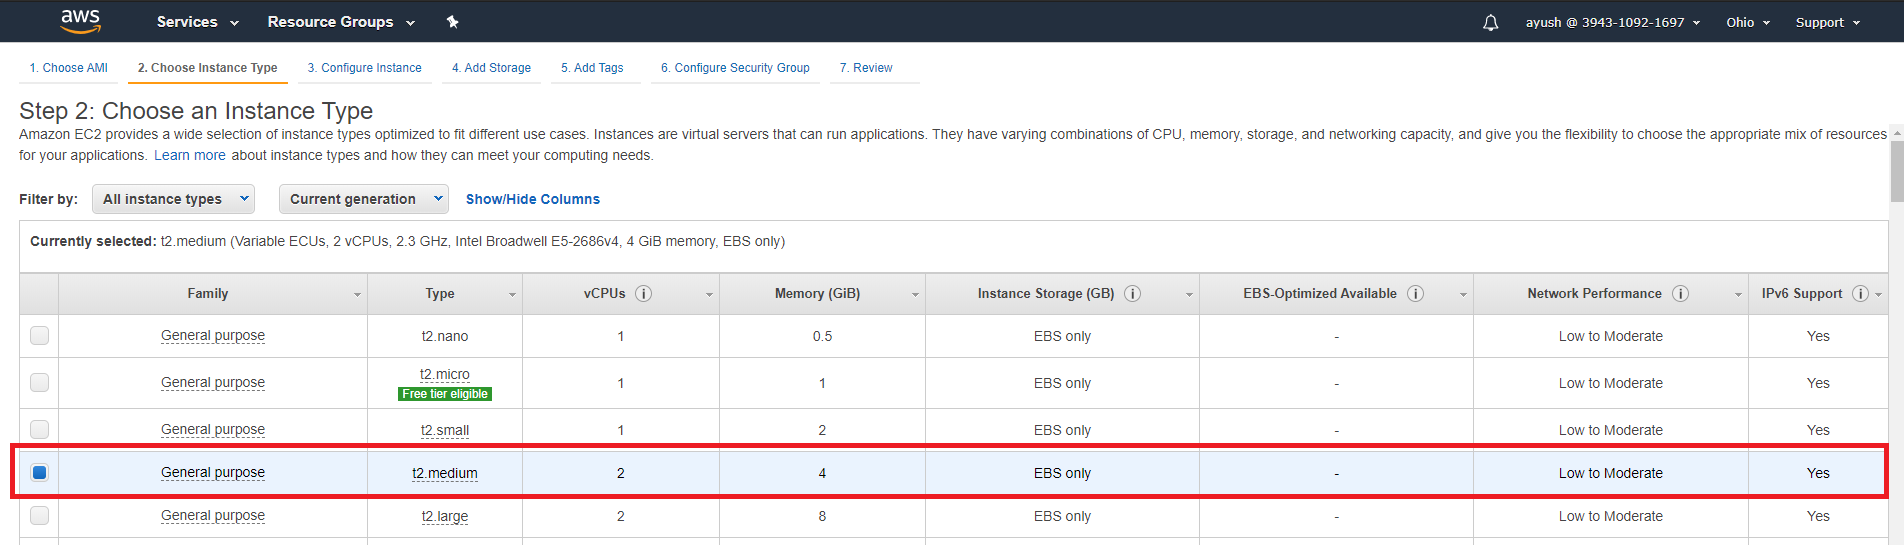
Under the 'Choose an Instance Type' menu, I selected 't2.medium' type primarily because of the requirement of at least 4GB memory to run all the tools along with Jenkins on the instance.
-
I left everything under the 'Configure Instance Details' page to their default values as no change was needed here.
-
Under the 'Add Storage' page, I changed the storage size from 8GB to 10GB, again, to accommodate all the tools that will be installed on the system. I left all the other options to their defaults.

-
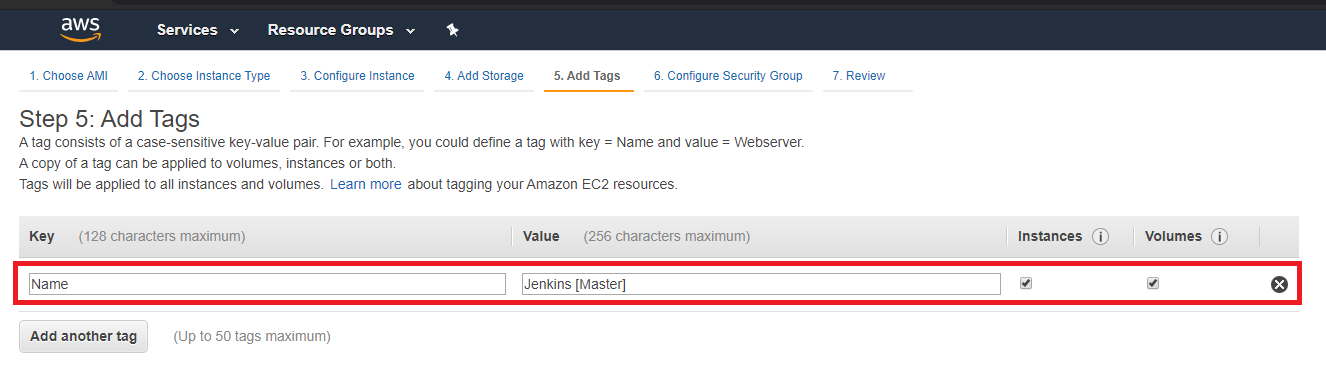
Under the 'Add Tags' page I added a tag with the instance's name ('Jenkins [Master]').
-
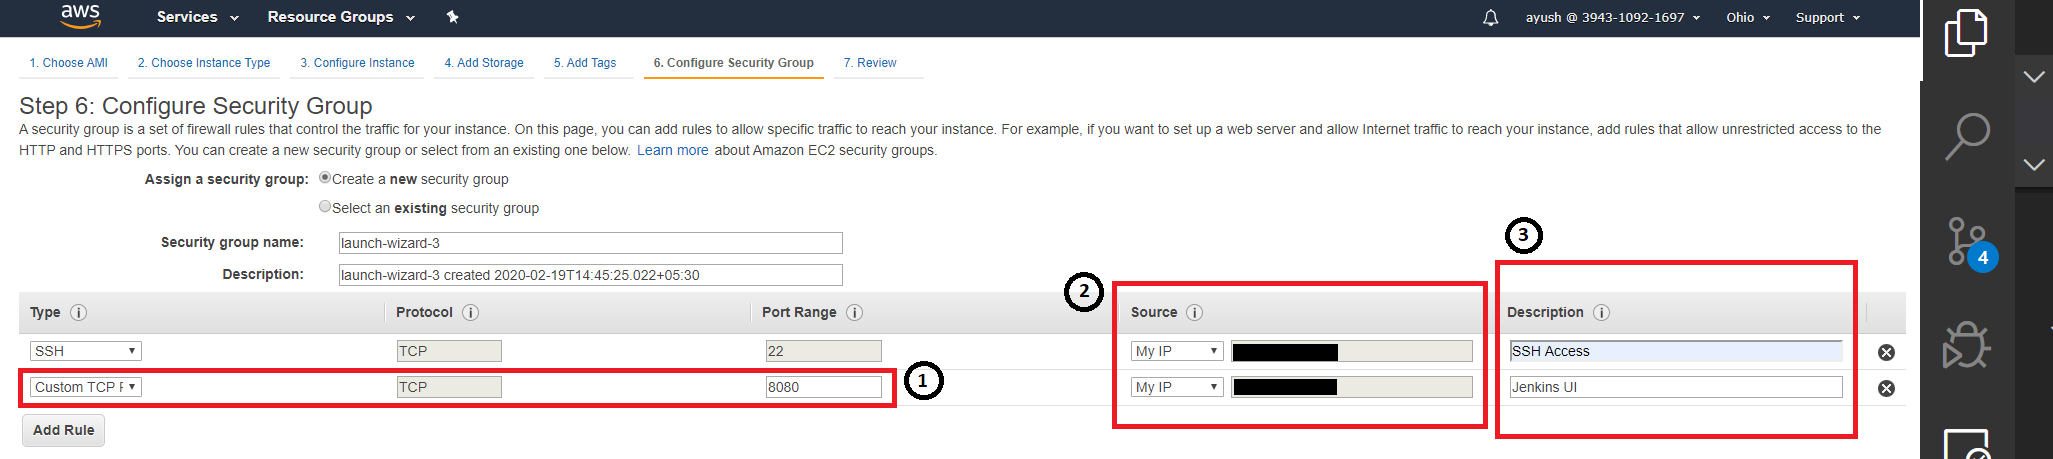
Under 'Configure Security Group' page:
- I clicked on the "Add Rule" button to add a new 'Custom TCP Rule', gave '8080' as the 'Port Range' because that is where the Jenkins UI is accessible.
- Under the 'Source' column, I selected the 'My IP' option to allow access only from my current IP.
- I gave a brief description of both the rules I added for the instance.
-
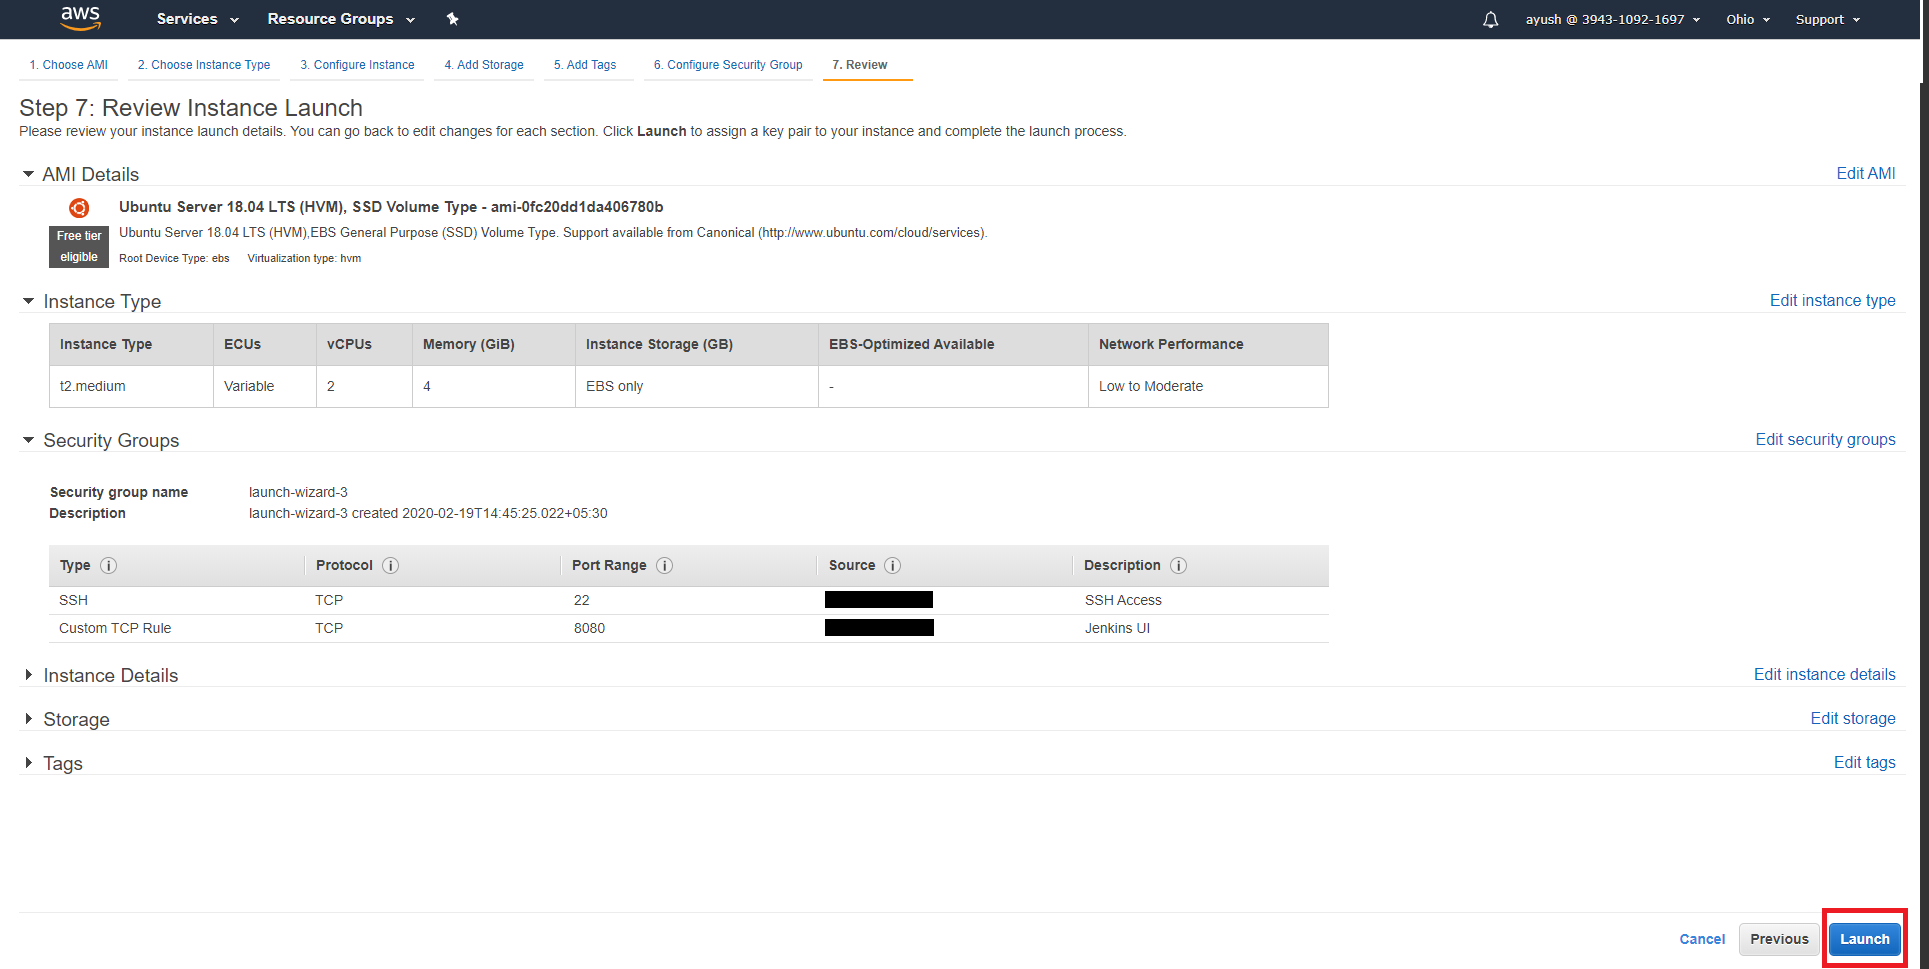
Lastly, I clicked on the 'Launch' button on the 'Review Instance Launch' page.
Installing Jenkins on EC2 Instance
After successfully starting the instance, I had to install Jenkins on it. I used the steps from the previous section that I wrote on the same.
- Starting Jenkins after the installation, I encountered an issue that I had not faced when I was running it on my machine locally. The URLs from where Jenkins fetches plugins had a few redirects which it was not able to handle on its own and failed to install any plugin. To rectify this issue, I ended up using Nginx(pronounced as 'Engine-X'), which is a reverse proxy and was able to handle the redirects successfully. To install Nginx, I followed this documentation. I, however, skipped step 5 on 'Setting Up Server Blocks' as it was not needed in the context of the problem statement. Lastly, as part of configuring Nginx, I wrote a config file,
jenkins-config, whose contents are mentioned below:
server {
    listen 80;
    server_name <EC2 PUBLIC IP>;

    location / {
      proxy_set_header        Host $host:$server_port;
      proxy_set_header        X-Real-IP $remote_addr;
      proxy_set_header        X-Forwarded-For $proxy_add_x_forwarded_for;
      proxy_set_header        X-Forwarded-Proto $scheme;

      # Fix the "It appears that your reverse proxy set up is broken" error.
      proxy_pass          http://127.0.0.1:8080;
      proxy_read_timeout  90;

      # proxy_redirect      http://127.0.0.1:8080;

          # Required for new HTTP-based CLI
      proxy_http_version 1.1;
          proxy_request_buffering off;
      # workaround for https://issues.jenkins-ci.org/browse/JENKINS-45651
      # add_header 'X-SSH-Endpoint' '<EC2 PUBLIC IP>:50022' always;
    }
}
- I placed this script under the
/etc/nginx/sites-available/directory. - Next, I created a symlink to the config file,
jenkins-config, as follows:
sudo ln -s /etc/nginx/sites-available/jenkins-config /etc/nginx/sites-enabled/
- Lastly, I reloaded the Nginx service to have it run the latest configuration:
sudo nginx -s reload
After resolving the issue, I installed the plugins that Jenkins recommends.
Configuring SAST Tools
After Jenkins was set up on an EC2 instance on AWS, the next step was to add all the tools required to perform the various tests on the application. Below, I have mentioned how I went about doing the same on AWS with a note about any additional steps I took when I deviate from the setup instructions mentioned in Static Analysis.
I, once again, made a reports/ directory inside Jenkins Home Directory to store all reports generated in a single location. This time, I also added a tool_scripts/ directory in the same location to house the various scripts I was required to use through the entire pipeline.
SonarQube
The installation for SonarQube is divided into two halves - setting up SonarQube Server and setting up the SonarQube Scanner. I was using docker previously to run the SonarQube Server on the local setup and hence, I had to use available services on AWS to run the SonarQube server as a container. For the second half, I re-used the steps from my documentation on installing SonarQube.
- To set up a container with SonarQube Server running in it, I followed this tutorial as it explained things in a simpler language as compared to other available articles. I, however, skipped steps
1and5as I directly pulled the docker image from docker hub and I did not want to use a domain to point to the container. So, in essence, I started off by creating a cluster on ECS (which is a collective of services and tasks), created a new task definition (which is the details about the container) and lastly, created a service to run the task (container). There was one other thing where I deviated from the tutorial I used, in the security group configuration, I added rules to allow access to the container only from my current IP by selecting the 'My IP' option under the 'Source' field and another rule to allow the Jenkins EC2 instance to access the container via its public IP.
Note: I had a doubt initially whether or not I could pull images from Docker hub directly. After searching for a bit, it turned that I could. I just had to specify the repository URL structure as docker.io/<docker-image-name>:version while creating the task definition.
- After setting up SonarQube Server, the rest of the setup was identical to the local setup. For configuring SonarQube Scanner, I followed all the steps (except the first one) as mentioned previously in the report here.
NPM Audit
For NPM Audit, I did not have to do any AWS specific configuration as it was installed on the Jenkins EC2 Instance itself and followed the steps from the documentation I wrote for the local setup. There were a few things that I did:
- I placed the bash script inside the
tool_scripts/directory mentioned at the start of this section. - I amended the
stagein the pipeline to execute the script from the new directory mentioned in the previous step.
NodeJsScan
For NodeJsScan, I again did not have to any additional step or deviate from the documentation I wrote in the static analysis section.
Retire.js
For Retire.js, I followed the documentation exactly as I had when I was setting it up on the local VM as there are no scripts or special requirements associated with this tool.
OWASP Dependency Check
For OWASP Dependency Check, I followed the documentation I wrote previously. The segments where I deviated are as follows:
- I placed the unzipped
dependency-check/directory intool_scripts/instead of Jenkins home directory. - I amended the
stageby changing the paths wherever necessary.
Auditjs
For Auditjs, I followed the steps from the documentation I wrote for the local setup. There were a few additional things that I did:
- I placed the bash script inside the
tool_scripts/directory mentioned at the start of this section. - I amended the
stagein the pipeline to execute the script from the new directory mentioned in the previous step.
Snyk
For Auditjs, I followed the steps from the documentation I wrote for the local setup. There were a few additional things that I did:
- I placed the bash script inside the
tool_scripts/directory mentioned at the start of this section. - I amended the
stagein the pipeline to execute the script from the new directory mentioned in the previous step.
Configuring DAST Tools
Both DAST tools, ZAP and W3AF, were set up on an EC2 instance different than the one running Jenkins Master node. This new EC2 instance was configured as a Jenkins Agent to run jobs making use of Jenkins' ability of distributed builds. To allow Jenkins Master EC2 instance to have access to the Jenkins Agent EC2, I configured SSH Keys and added a new node as I did previously with the local setup mentioned here.
Note: Since DVNA had to be running for DAST, I used PM2 to run DVNA on the Jenkins Master EC2 instance. At one point, DVNA was trying to fetch view from a wrong directory even after restarting, stopping and starting again. This turned out to be because of the existence of caching when an app is run with PM2 as mentioned in this article. The rectification of this issue was also mentioned in the article. I had to delete the app from PM2's app list and then start it afterward. This solved the problem.
OWASP ZAP
I used ZAP with its docker image as I did in the local setup. I followed these instructions to first install Docker on the Agent EC2 instance. I then followed my own documentation to run the ZAP baseline scan with the official docker image.
After pulling the image from Docker Hub, I skipped to running the baseline scan as I had already tested the usage mentioned in the report previously and hence, there was no need to repeat the process.
W3AF
I used W3AF exactly as before in the local setup, by installing it on the Agent EC2 instance. I configured W3AF exactly as mentioned in the documentation I wrote previously.
Configuring Code Analysis Tools
JsHint
I followed the documentation I wrote for JsHint while setting it up locally exactly as mentioned.
EsLint
I followed the documentation I wrote for Eslint while setting it up locally exactly as mentioned. I also stored the required configurations JSON (.eslintrc.json) in the tool_scripts/ directory and copied it to the workspace directory during the execution of the lint analysis stage with EsLint.
Generating Software Bill of Materials
I followed the documentation I wrote previously to generate the Software Bill of Materials for DVNA with CycloneDX. I installed CycloneDX as I did before for the local setup. In the pipeline stage to generate the SBoM, I skipped the npm install step as here, I had already built the dependencies in a prior stage in the pipeline.
Configuring Jenkins Pipeline
Webhook for Jenkins on AWS
To configure the webhook to trigger the execution of the pipeline on push and release events, I followed the steps exactly as mentioned in this report. I just replaced the payload URL to use the public IP of the EC2 instance running Jenkins. I also skipped the segment on Ngrok as in this case, the VM was accessible over the web via the public IP provided by AWS to the instance, hence, there was no need to use Ngrok.
Deploying DVNA on AWS
Since I was shifting everything to AWS I thought of changing the deployment strategy for DVNA from running it on a VM to running it as a Docker Container on AWS. I redid the deployment from scratch specifically for AWS utilizing features it offers. The steps I followed to deploy DVNA on AWS as a container are mentioned below:
-
I decided to use the Jenkins Agent EC2 machine to build and deploy DVNA on AWS as a docker container.
-
I installed AWS CLI to perform actions from the terminal itself and not the web console. I followed along with Amazon's official documentation for the same as it was well written and concise. I, however, skipped the section on 'Install Pip' as I already had
pipinstalled on the machine. -
Next, I authenticated the AWS CLI by running
aws configureand providing the prompt with myAccess Key ID,Secret Access Key,Default RegionandOutput Format. -
Since, I wanted to use the docker images I build and not from the official docker images available on Docker Hub, I had to create a Registry on Amazon Container Registry (ECR) to store these custom images. For this, I required an additional policy,
AmazonEC2ContainerRegistryPowerUser, to be attached to my IAM role. -
After the policy was attached to my IAM Role, I created a new registry,
dvna-aws-registry, by executingaws ecr create-repository --repository-name dvna-aws-registryon the Jenkins Agent EC2 instance's terminal with help from this blog. -
The next step was to build the initial image and push to the registry I made in the previous step to be able to launch the initial deployment of DVNA on AWS ECS. To do this, I pulled DVNA from GitHub and ran
docker build -t dvna_app .to create the image locally on the Jenkins Agent EC2 instance. -
Then I had to tag the image to be able to push it to the ECR registry I created previously. I did so by running the following command:
docker tag dvna_app:latest <ID>.dkr.ecr.us-east-2.amazonaws.com/dvna-aws-registry:latest
- I, then, pushed the image to the registry on ECR with the following command:
docker push <ID>.dkr.ecr.us-east-2.amazonaws.com/dvna-aws-registry:latest
-
I decided on another alteration to the deployment strategy I had for the local setup, I used AWS RDS to host a MySQL database for DVNA. I created a database instance,
mysql-db, on RDS using the console, added the Master User as root, set the password for it and took note of the database URL. -
Next, I created a task definition (
deployDVNA), as I did for SonarQube following this tutorial, to run DVNA by pulling the image I created from the ECR registry. Since the database was not another container, I just passed along the database connection configuration details as environment variables while configuring the container details. -
I created a new cluster from the console,
deploymentCluster, added a new service (dvnaDeployService) and added a new task inside it from the task definition in the previous step and ran the task.
Note: Running the task failed initially. Going through the logs, it turned out to be because the app was not able to connect with the database as there was no database named dvna as was needed. So, I created this database manually by connecting to the RDS database instance from the terminal by logging in to the mysql with mysql -u root -h <RDS DB URL> -p and then creating the database with create database dvna; and then exited. Re-running the task again resulted in successful deployment on DVNA with ECS on AWS.
-
Now, to deploy the new image every time, I decided on stopping the currently running tasks under
dvnaDeployServiceas then the service would automatically fetch the image with the tag 'latest' and run a new task. Since, every time I push a new image with the 'latest' tag, the previous one would get untagged, the service would always fetch the latest build. To do this I looked up how to list and stop tasks. I followed Amazon's official documentation to list tasks and to stop tasks. -
Since, I was now clear with the individual steps, I created a script to combine each action rather than running them individually from the pipeline. The script first authenticated the docker CLI to be able to push images, cloned the project repository, built the image, tagged it with 'latest' and pushed to ECR. It then fetched all active tasks running DVNA and stopped them and waited for them to brought back up with the latest image. Lastly, it again fetched the URLs for the latest deployment of DVNA. The script's contents are mentioned below:
#!/bin/bash

# Cloning the project repository to build the image
git clone https://github.com/ayushpriya10/dvna.git
cd dvna

# Login to the ECR Registry to push docker images
$(aws ecr get-login --no-include-email --region us-east-2)

# Building the docker image, tagging it as 'latest' and pushing it to the registry
docker build -t dvna_app .
docker tag dvna_app:latest <ID>.dkr.ecr.us-east-2.amazonaws.com/dvna-aws-registry:latest
docker push <ID>.dkr.ecr.us-east-2.amazonaws.com/dvna-aws-registry:latest

# Fetching all active tasks running under the 'deploymentCluster'
task_arns=`aws ecs list-tasks --cluster deploymentCluster | jq '.taskArns' | jq -c '.[]'`

# Stopping all tasks which are running the older docker image of DVNA
for task in $task_arns
do
    echo "Stopping Task: $task"
    task_id=`echo $task | cut -d '/' -f 2 | cut -d '"' -f 1`
    aws ecs stop-task --cluster deploymentCluster --task $task_id > /dev/null
done

# Waiting for 'dvnaDeployService' to automatically run a new task
echo "Waiting for 1 minute for AWS to bring up new ECS Tasks..."
sleep 1m

# Fetching all active tasks under 'deploymentCluster'
task_arns=`aws ecs list-tasks --cluster deploymentCluster | jq '.taskArns' | jq -c '.[]'`

# Printing the URL where DVNA instance(s) were deployed
for task in $task_arns
do
    echo "New Task ARN: $task"

    task_id=`echo $task | cut -d '/' -f 2 | cut -d '"' -f 1`
    task_attachments=`aws ecs describe-tasks --cluster deploymentCluster --tasks $task_id | jq '.tasks[0].attachments[0].details' | jq -c '.[]'`
    for attachment in $task_attachments
    do
        name=`echo $attachment | jq '.name'`

        if [ "$name" == "\"networkInterfaceId\"" ]; then
            interface_id=`echo $attachment | jq '.value'`
            interface_id=`echo $interface_id | tr -d "\""`
        fi
    done
    public_ip=`aws ec2 describe-network-interfaces --network-interface-ids $interface_id | jq '.NetworkInterfaces[0].Association.PublicIp' | tr -d "\""`
    echo "DVNA is deployed at: http://$public_ip:9090"
done
- Next, I added a stage in the pipeline to execute this script on the Jenkins Agent EC2 instance.
Note: Due to a issue in the $PATH variable, aws was not recognized as a command (even though it worked fine when I ran it on the machine directly over SSH). To solve this issue I added a symlink as follows:
sudo ln -s /home/ubuntu/.local/bin/aws /usr/local/bin/aws
- Though the deployment setup was complete, I added an additional step to clear out all the older docker images (which got untagged) from the machine using the following command:
docker rmi $(docker images | grep none | awk '{print $3}')
Final Pipeline Structure
After making all the amendments required to shift the entire setup from a local machine to AWS, the pipeline structure was altered a bit. I took this opportunity to rename a few stages and make small changes to the pipeline syntax to make it more uniform and clean. The updated pipeline script, though identical in function as the local version, with the amendments is mentioned below:
pipeline {
    agent any

    stages {
        stage ('Fetching Code from Repository') {
            steps {
                git url: 'https://github.com/ayushpriya10/dvna.git'
            }
        }

        stage ('Building Dependencies') {
            steps {
                sh 'npm install'
            }
        }

        stage ('SAST with SonarQube') {
            environment {
                scannerHome = tool 'SonarQube Scanner'
            }

            steps {
                withSonarQubeEnv ('SonarQube Server') {
                    sh '${scannerHome}/bin/sonar-scanner'
                    sh 'cat .scannerwork/report-task.txt > /var/lib/jenkins/reports/sonarqube-report'
                }
            }
        }

        stage ('SAST with NPM Audit') {
            steps {
                sh '/var/lib/jenkins/tool_scripts/npm-audit.sh'
            }
        }

        stage ('SAST with NodeJsScan') {
            steps {
                sh 'nodejsscan --directory `pwd` --output /var/lib/jenkins/reports/nodejsscan-report'
            }
        }

        stage ('SAST with Retire.js') {
            steps {
                sh 'retire --path `pwd` --outputformat json --outputpath /var/lib/jenkins/reports/retirejs-report --exitwith 0'
            }
        }

        stage ('SAST with  Dependency Check') {
            steps {
                sh '/var/lib/jenkins/tool_scripts/dependency-check/bin/dependency-check.sh --scan /var/lib/jenkins/workspace/dvna-aws-pipeline --format JSON --out /var/lib/jenkins/reports/dependency-check-report --prettyPrint'
            }
        }

        stage ('SAST with Auditjs') {
            steps {
                sh '/var/lib/jenkins/tool_scripts/auditjs.sh'
            }
        }

        stage ('SAST with Snyk') {
            steps {
                sh '/var/lib/jenkins/tool_scripts/snyk.sh'
            }
        }

        stage ('Starting DVNA for DAST') {
            steps {
                sh '''
                source /var/lib/jenkins/tool_scripts/env.sh
                pm2 restart server.js
                '''
            }
        }

        stage ('DAST with ZAP') {
            agent {
                label 'jenkins-agent-ec2'
            }
            steps {
                sh '/home/ubuntu/zap_baseline.sh'
                sh 'scp baseline-report.html jenkins@3.14.249.80:/var/lib/jenkins/reports/zap-report'
            }
        }

        stage ('DAST with W3AF') {
            agent {
                label 'jenkins-agent-ec2'
            }
            steps {
                sh '/home/ubuntu/w3af/w3af_console -s /home/ubuntu/w3af_config'
                sh 'scp output-w3af.txt jenkins@3.14.249.80:/var/lib/jenkins/reports/w3af-report'
            }
        }

        stage ('Stopping DVNA Instance') {
            steps {
                sh 'pm2 stop server.js'
            }
        }

        stage ('Code Quality Analysis with JsHint') {
            steps {
                sh '/var/lib/jenkins/tool_scripts/jshint.sh'
            }
        }

        stage ('Code Quality Analysis with EsLint') {
            steps {
                sh '/var/lib/jenkins/tool_scripts/eslint.sh'
            }
        }

        stage ('Generating Software Bill of Materials') {
            steps {
                sh 'cyclonedx-bom -o /var/lib/jenkins/reports/sbom.xml'
            }
        }

        stage ('Build and Deploy DVNA') {
            agent {
                label 'jenkins-agent-ec2'
            }

            steps {
                sh '/home/ubuntu/task-manager.sh'
                sh 'rm -rf ./*'
                sh 'docker rmi $(docker images | grep none | awk \'{print $3}\')'
            }
        }

    }
}