Configuring Trigger with Webhook
Objective
The aim of this section is to create and configure a webhook to automate builds based on defined events occurring on the project repository in reference to the second sub-segment of the 8th point in the problem statement under Task 1.
Webhooks
Webhooks, sometimes referred to as Reverse APIs, are functions that are triggered by the occurrence of selected events. These functions, generally, are used to notify a different interface/endpoint about the occurrence of the event.
To build and deploy the application based on push events and new releases on the project repository on GitHub automatically, I needed a Jenkins Webhook to handle a trigger that GitHub will send when selected events occur.
To create a webhook as part of the solution for the problem statement, I used this article as it also used ngrok as I was supposed to use in further sections. I, however, did not add the GitHub repository link under Configure Jenkins > GitHub Pull Requests mentioned in the article, as the webhook worked without it as well.
Configuring Jenkins Pipeline for Webhook
For Jenkins, the configuration was straightforward and simple. All I had to do was to select the GitHub hook trigger for GITScm polling option under Build triggers for the Jenkins pipeline. This option allows Jenkins to listen for any requests sent to it via GitHub (in this case) and then trigger a new build for the project which has the option checked.
Configuring GitHub for Webhook
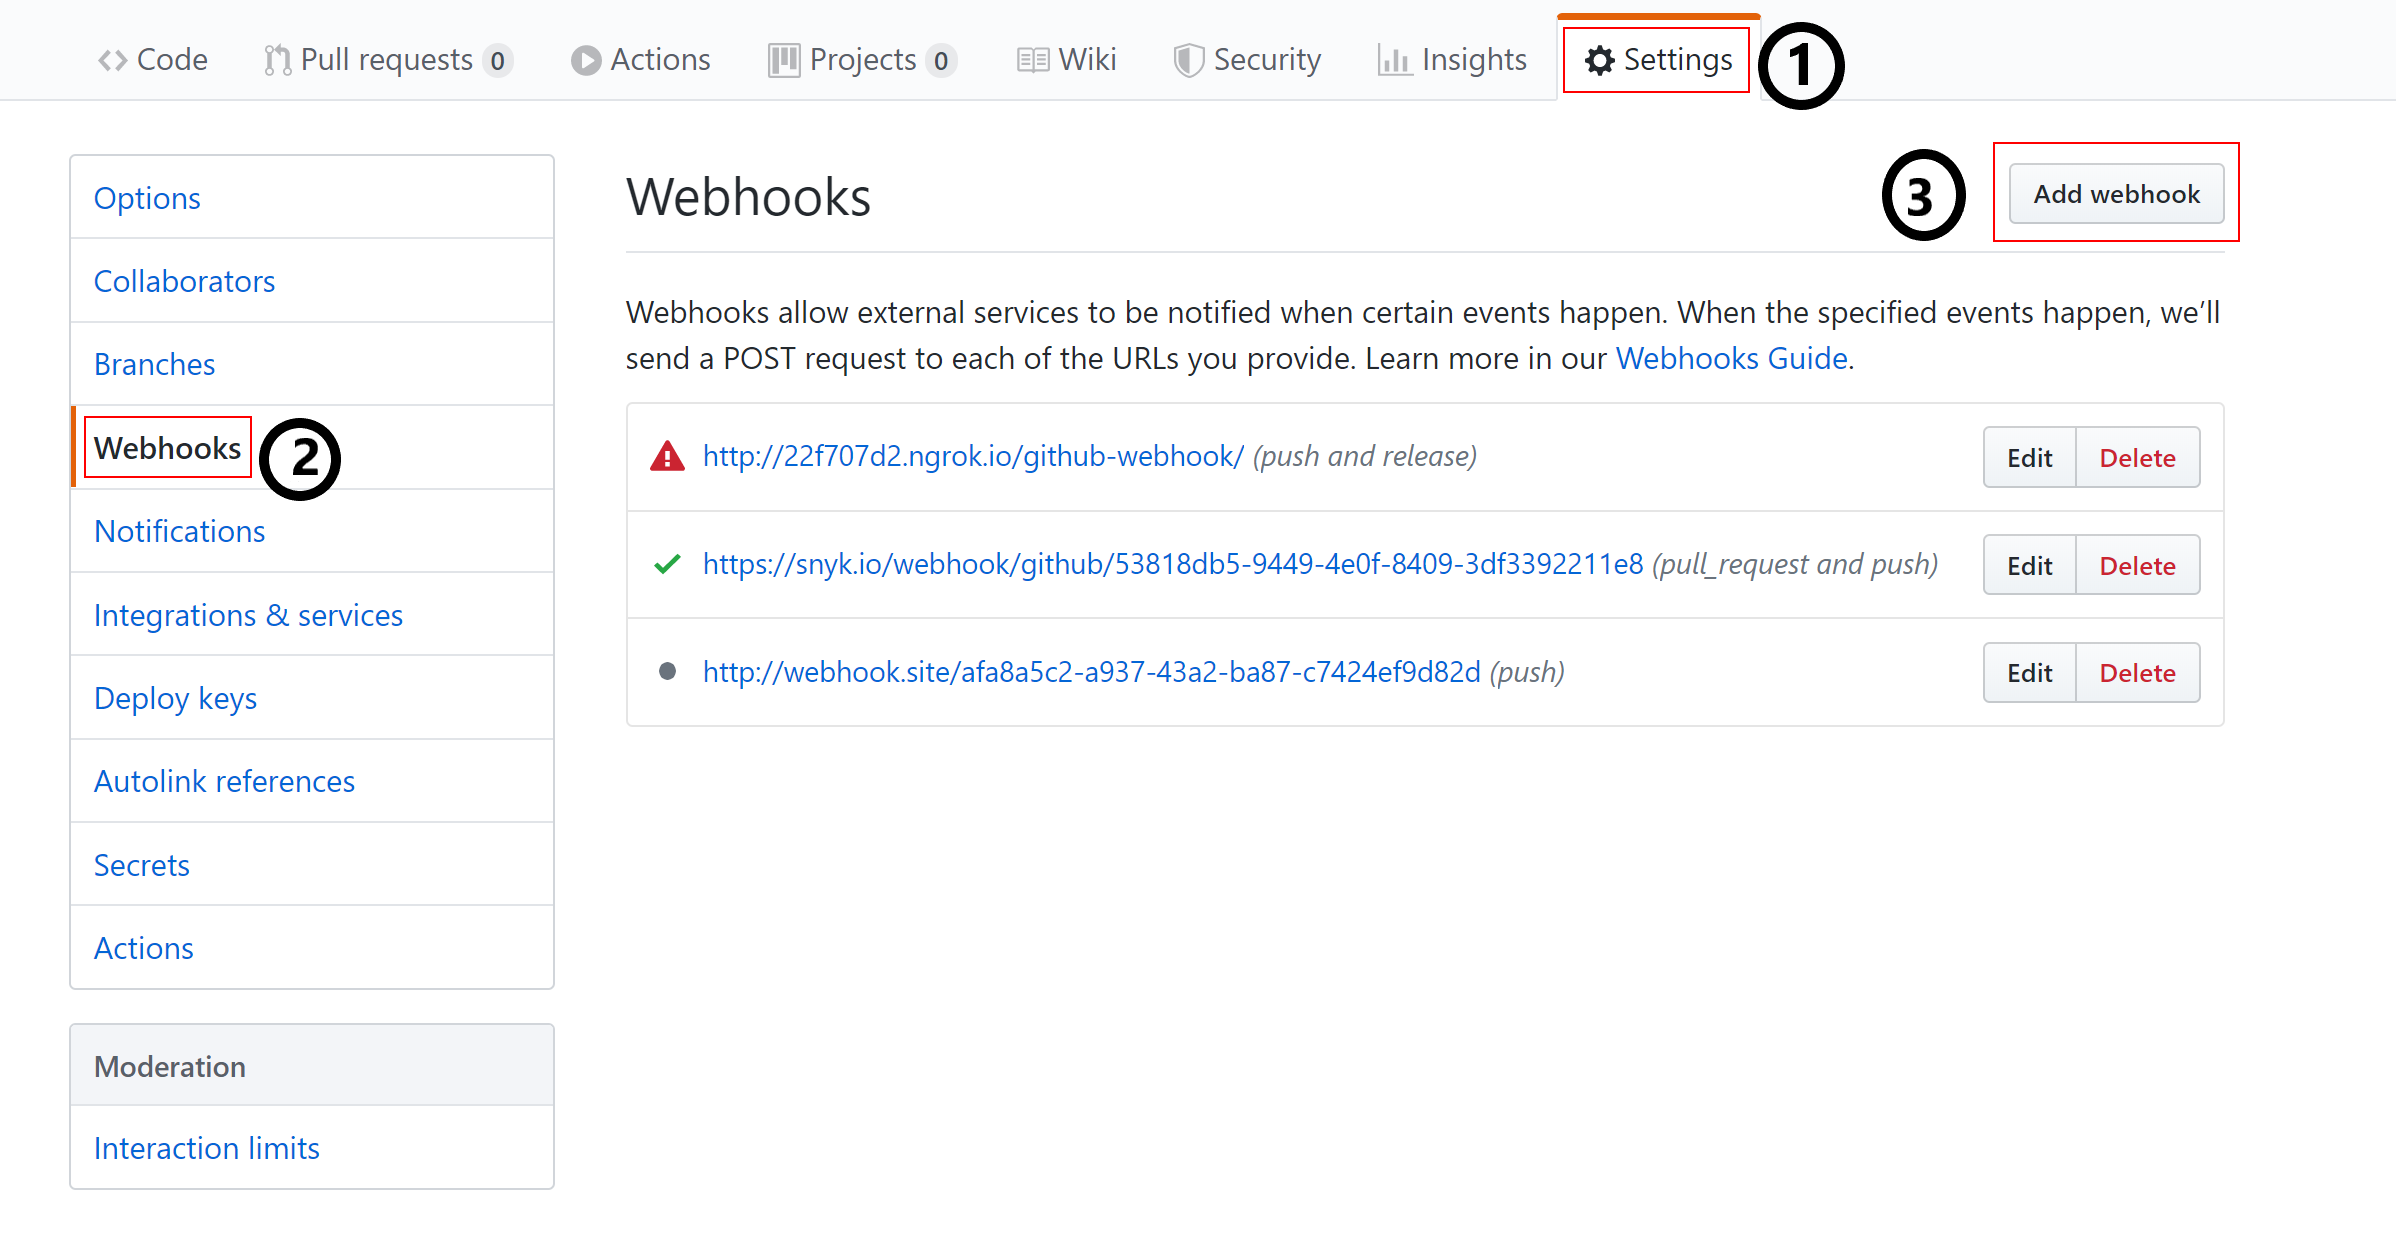
Then I needed to add a webhook trigger on GitHub for the project repository. Following the documentation, mentioned above, I went to the Settings page for the repository and from there, I went to the Webhooks page. Then clicking on the Add New button, I got a page asking for specifics about the webhook that I wanted to create:
- The
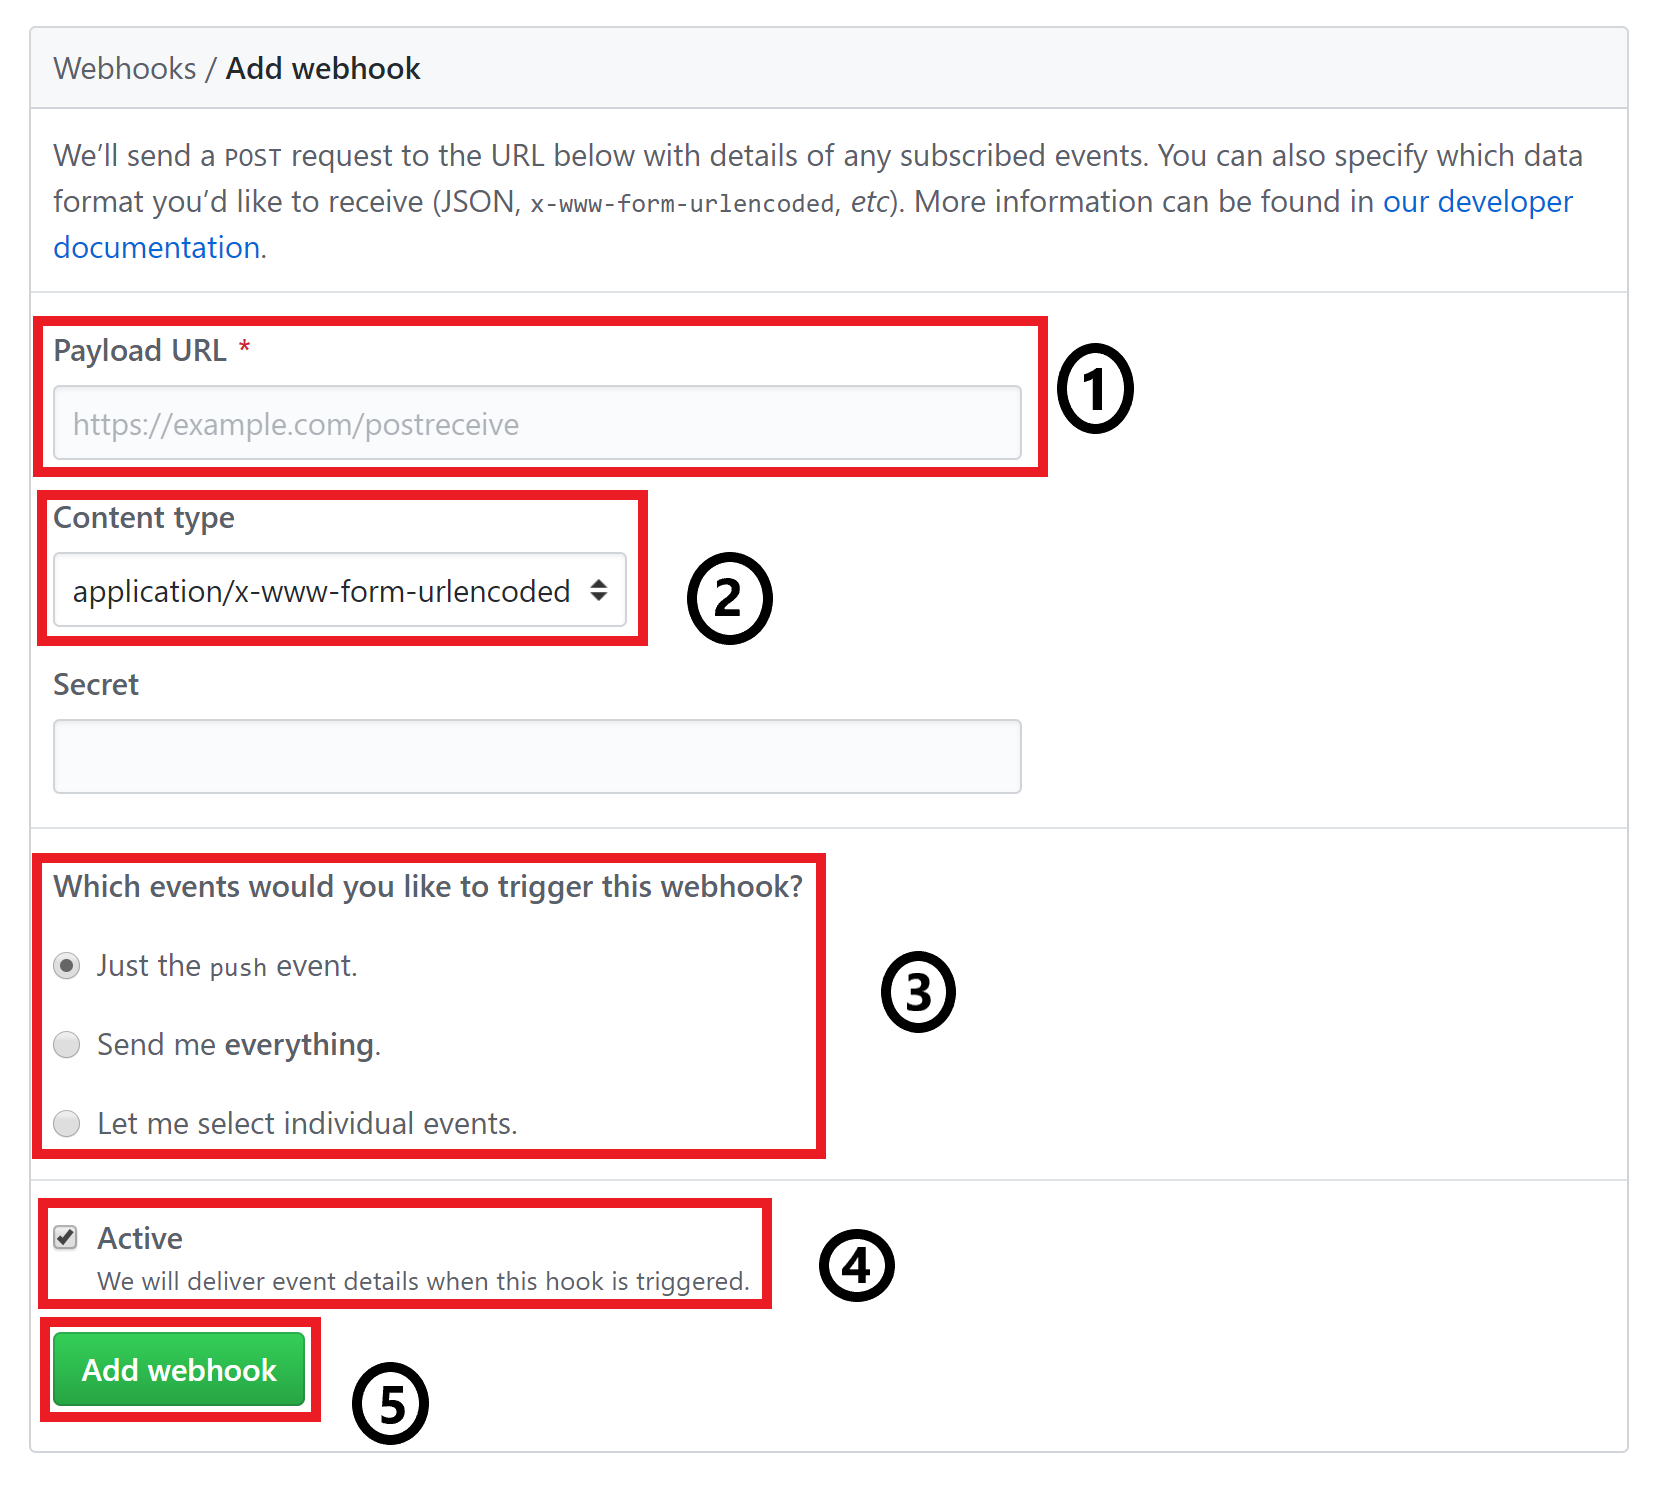
Payload URLis where I had to put my Jenkins Servers domain/IP which would be handling the webhook. As required by Jenkins, a valid Jenkins Webhook is a domain/IP appended with/github-webhook/at the end. For example,http://{JENKINS_VM_IP}/github-webhook/is a valid Jenkins webhook. - I put the
Content Typeasapplication/jsonas Jenkins expects a JSON formatted request. - Then I selected the required events that should trigger the webhook, and in turn, start the build via Jenkins. In this case, the events that were required by the problem statement were 'Pushes' and 'Releases'.
- Lastly, I checked the
Activeoption and saved the Webhook. The active option is necessary to be set to checked else, GitHub does not send any request. I tried triggering the selected events, after unchecking the option, and it did not send any request.
Note: The webhook's payload URL should have exactly /github-webhook/ at the end. Missing the slash at the end will not be handled and thus, no build will be triggered if the exact route is not appended to the payload URL.
Using ngrok to handle Webhook over Internet
Now, GitHub needed a public IP/domain to send the event payload to when the webhook gets triggered over the internet. Since the setup I had was on my local machine, I ended up using ngrok.
Ngrok is a tool that helps to expose a machine to the internet by providing a dynamically generated URL that can be used to tunnel traffic from the internet to our local machine and use it as needed.
I found the basic documentation, which was enough for me to use it for the purpose of this task, on the downloads page itself. So, as specified in the instructions given at the site:
- I downloaded the
ngrokexecutable, which was available for download here, on the Jenkins VM. - Then I unzipped the downloaded file as follows:
unzip /path/to/ngrok.zip
Ngrokrequires an authentication token to work. Hence, I signed up for an account to get an Authentication Token and then authenticatedngrokfor initialization as follows:
./ngrok authtoken <AUTH_TOKEN>
- Finally, to run
ngrokand start an HTTP Tunnel, I used the following command:
./ngrok http 8080
Note: I used port 8080, instead of the usual 80 used for HTTP traffic, as my instance of Jenkins was running on 8080.
- Lastly, I took the URL provided by
ngrok, appended/github-webhook/at the end, and used it as thePAYLOAD URLon GitHub for the Webhook as mentioned in the Configuring GitHub for Webhook section above. The final payload URL was like -http://{DYNAMIC_SUBDOMAIN}.ngrok.io/github-webhook/where the dynamic subdomain was generated byngrokto create a unique tunnel for us to use.